CHAPTER
II
ELECTRICAL
MEASUREMENTS
2.1. INTRODUCTION
A variety of instruments are available for the measurement of the
different electrical variables. The used principles include the
electromechanical meter movement, electromagnetic induction, thermocouples, and
electronic meters.
The permanent magnet moving coil instruments are based on the
galvanometer invented by Arsene d’Arsonval. This device possesses a stationary
permanent magnet, a moving coil, a spring, and a pointer attached to the coil. Figure 2.1
illustrates the way the equipment works. When a current flows through the coil,
there is an induced force on it due to the created electromagnetic field, and
the coil rotates around its central axis until the induced torque is equal and
opposite to the spring torque. The rotation torque, and consequently the angle
the pointer rotates is proportional to the current. The rotation angle is
measured on a calibrated scale, and the amount of current flowing through the
meter can be measured. The d’Arsonval movement is used basically to measure
average or DC currents and voltages.
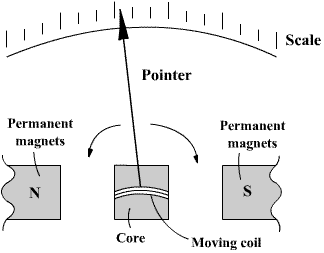
Figure 2.1. d’Arsonval Meter
Movement
2.2. –VOLTAGE, CURRENT, AND RESISTANCE
MEASUREMENTS
Figure 2.2 shows a device based on the d’Arsonval movement, which is
frequently used for measuring different electrical quantities. This equipment
is known as analogical multimeter. By
locating the range switch and the function switch in the proper position, the
desired variable may be measured in the selected scale.
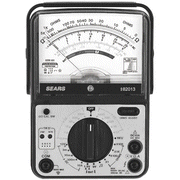
Figure 2.2. Analog Multimeter
Current Measurement
This type of
device is used to measure currents typically up to 1 Amp.
1)
The first step is to
locate the range and function switches in the proper position, observing that
the function switch is in the AC or DC current position, and the range switch
actually selecting a range with maximum value higher than the expected current value.
2)
The meter is connected,
using its leads, in series with the element where the current is going to be
measured, as can be seen in figure 2.3.
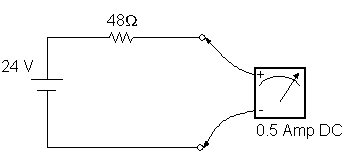
Figure 2.3. Current Measurement
Voltage Measurement
1)
Select the AC or DC
voltage position, depending on the characteristics of the measured voltage, and
select also the correct scale.
2)
Connect the meter in the
way shown in Figure 2.4.
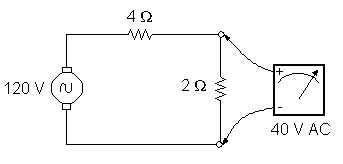
Figure 2.4. Voltage Measurement
Resistance Measurement
1)
Select the resistance
(Ohm) position
2)
Connect the meter leads
to the terminals of the measured device.
It is important to be
aware of the fact that the device resistance shall never be measured if it is connected to the energy source or to other
devices. For measuring the resistance, the device will be isolated from the
rest of the circuit.
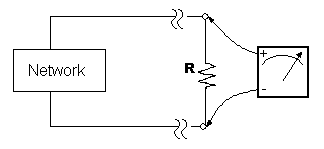
Figure 2.5 Resistance Measurement
The resistance measurement may be used also to check if there is a
closed circuit between two terminals of a passive network as can be seen in
Figure 2.6.
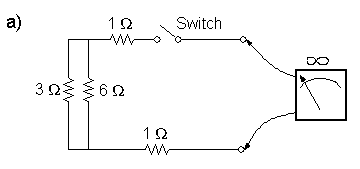
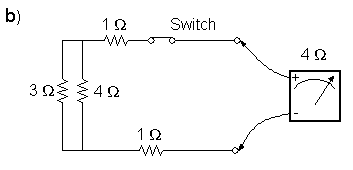
Figure 2.6. Continuity Measurement in circuits
The digital multimeter uses electronic principles for making the
measures. It is shown in Figure 2.7. Some of its advantages are:
1)
Better accuracy
2)
More functions can be
incorporated with one meter.
3)
Auto-ranging as well as
automatic polarity indication is possible.
The mode the digital multimeter is connected to the circuit is the same
as for the analog multimeter.
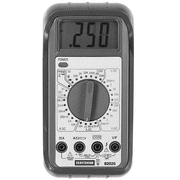
Figure 2.7. Digital Multimeter
For measuring voltage, select AC or DC. Select the range for the V scale and connect test leads in
parallel with the load. To avoid shock hazard or meter damage, do not apply more
than 1000 V DC or 750 V AC. For measuring current, select AC or DC. Select the range for the A scale and
connect test leads in series with the circuit. For measuring resistance, select W
(Ohms) function and
connect the leads to the load. For continuity detection, select, if there is continuity in the
circuit when connecting the leads a beep will be heard.
High Current Measurements
When measuring AC currents at levels greater than one Ampere, the
clamp-on meter is frequently used. These meters use the principle of
electromagnetic field induction and clamp over the wire, without breaking the
insulation as shown in Figure 2.8. when using this method, be sure to measure
only one conductor at a time.

Figure 2.8. Clamp-on Ammeter
2.3. –POWER MEASUREMENTS
For measuring power in pure resistive circuits it is possible to use an
ammeter and a voltmeter and calculate the power using the formula p = v i. In
place of doing this, a power- measuring meter called a wattmeter can be used.
Using the wattmeter the following advantages are obtained:
1)
Simplify the
measurement, due to the use of one device only.
2)
If the circuit has
inductors and capacitors, the use of
ammeter and voltmeter gives the apparent power in place of the real
power.
3)
Voltmeters and ammeters
consume power. Therefore, very accurate power measurements can not be made by
measuring voltage and current and then calculating the power.
A wattmeter has two internal coils, namely, a
voltage coil and a current coil. The voltage coil is connected in parallel to
the circuit, where the power is to be measured and the current coil is
connected in series with the circuit. The wattmeter gives a direct indication
of the real (average) power of the circuit.
2.4. –INSULATION MEASUREMENTS
When several millions of Ohms are going to be
measured, an ordinary ohmmeter can not be used. This situation occurs for
example in conductor insulation or transformer winding measurements. The device used in these cases
is called megohmmeter or megger. The meter is similar to a moving-coil meter,
except that it has two windings. There are three types of meggers, depending on
the way they receive the eneregy: hand, battery and electric.
Newer meggers instead of having a scaled
meter movement, present the value of resistance in a digital readout display.
The digital readout makes reading much easier and helps to eliminate errors.
Figure 2.9. shows a digital megger.
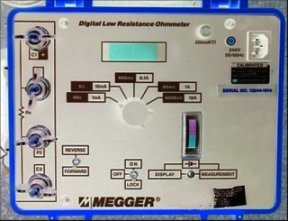
Figure 2.9. Digital Megger
Besides the enumerated measurements, other electrical variables are
measured frequently, for example: frequency, power factor, capacitance, inductance,
etc.
2.5. –VOLTAGE TESTERS
The basic component of this instrument is a
solenoid. When a current flows across the coil, a magnetic field is produced.
The magnetic field intensity is
proportional to the current and consequently to the applied voltage. Due to the
magnetic field, a force is induced pulling a plunger down to a spring (Figure
2.10). As the current increases, the plunger moves farther. A pointer on the
plunger indicates the potential difference on a scale. The instrument also
indicates whether the circuit is AC or DC by vibrating on alternating current.
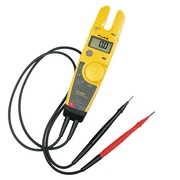
Figure 2.10. Voltage Tester
Another very useful device for the electrician is the neon-glow lamp
tester, shown in figure 2.11. It consist of a very small neon lamp in series
with a 200,000 Ohms protective resistance enclosed in a molded case. The tester
works satisfactorily in circuits from 60 V AC
to 500 V AC. With the test tips connected to the circuit, if a
voltage exist between the indicated limits, the lamp will glow. Higher voltage
corresponds to higher glow. If both electrodes in the lamp glow, the voltage is
alternating. On dc, only one electrode glows.
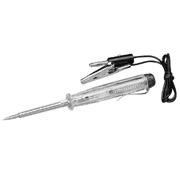
Figure 2.11. Neon-glow lamp
tester